Tofu Almond Soba Noodle

I’ve had some insanely busy past few weeks but I always try to make time for playing around with fun ingredients – this time it’s with Tofu!   Many people don’t like tofu mainly because tofu on its own has little to no taste. I’ve grown up eating tofu and eating all types of tofu (yes, there are different types!) but nothing beats a simple extra firm tofu grilled on a pan with a touch of olive oil and salt.  It’s the chewy texture that I absolutely love and if you pair it with punchy flavours, the tofu will take on the tastes of its neighbours.  This recipe is a deliciously nutty and easy to prepare vegetarian dish for tofu beginners and lovers alike! The creaminess of the almond butter and crunch of the toasted almonds balances the wonderfully chewy tofu leaving you wanting more…

Serves 4

400g buckwheat soba noodles
1 tbsp olive oil

400g extra firm tofu
2 tbsp olive oil
a few pinches of sea salt

Dressing
6 tbsp almond butter, 100g
2 tsp white miso paste
1 lime juiced
¼ tsp sea salt
6 tbsp water

For Garnish
30g flaked almonds
4 stalks spring onion, sliced
handful of mint leaves
1 red chili (optional)

  1. Make the almond dressing by combining all the ingredients except the water and whisk until even. Add the water one tablespoon at a time until consistency is like double cream.
  2. Bring a pot of water to the boil and cook the noodles for 3-4 minutes until al dente. Drain thoroughly and rinse under cold running water. Toss in 1 tbsp olive to prevent the noodles from sticking together.
  3. Cut the tofu into ½ cubes and cook on medium high heat with olive oil and 2 pinches of salt until golden brown, approximately 5 minutes. Add the noodles onto the pan for 30 seconds to reheat.
  4. Toss the warm noodles and tofu in almond dressing and garnish with almonds, spring onions, mint leaves and chili.

Granola Energy Bars

IMG_3570

I kind of have a thing for granola…and therefore granola bars. Unfortunately, granola bars are one of those snacks that don’t often receive great marks for health. Majority of those store-bought or packaged bars contain a lot of refined, processed sugar and they don’t actually fill you up. Half the time you don’t actually know what’s inside of them. These bars however, are different. I developed this recipe a couple of month’s ago for the Waitrose Kitchen magazine in the UK and they were very well received. There is something to be said for knowing what goes into your food, especially something that you may need pre or post workout for that extra boost of energy. Made with natural binding agents like medjool dates and almond butter, these bars are packed with protein and carbohydrates that will fuel you through the day. They do contain sugar, but naturally through the dried fruit and honey so your body processes it slower. Easy to prepare and packed with nutritious ingredients, these really are the perfect bar for a hearty snack because they keep you full for hours and don’t provide a sugar overload. Plus, they pack in plenty of healthy fats from the nuts and lots of fiber from the oats. You can easily substitute a different nut butter or variety of nuts and seeds within the bars, just be sure to keep the quantities the same. Keep stored in a container in the fridge for as long as they will last… I promise it won’t be long!

Almond Butter Energy Bars

Makes 12 large bars or 24 small bars
Prepare 15 minutes, plus chilling
Cook 20 minutes

IMG_3568

250 g (2.5cups)   Rolled Oats ( I like to use quick porridge oats, large flakes are too big!)
40   g  (2/3 cup)  Desiccated coconut
40   g  (1/2 cup)  Sliced Almonds
40   g   (1/2 cup)  Pumpkin seeds
150 g   (approx. 5 or 6)  Pitted medjool dates
50   g   (approx. 3) Prunes
85   g   (1/4 cup)  Honey
100 g   (roughly 1/2 cup) Meridian Crunchy Almond Butter
1 tbsp    Coconut Oil
3 tbsp    Water
1 ½ tsp  Ground Cinnamon
Pinch of SaltIMG_3538

Method

    1. Preheat the oven to 165C. Line a tray with parchment paper. Combine oats, coconut, seeds and nuts. Toast for 20 minutes, tossing occasionally until golden brown
    2. Meanwhile, in a food processor combine the dates and prunes and blitz until a smooth paste has formed. Add to the honey, almond butter, coconut oil, cinnamon, salt and water in a small saucepan. Place over medium heat and stir until combined.IMG_3545
    3. In a large bowl combine the oat mixture with nut butter mixture and stir until it has come together.
    4. Place mixture into a 9 “ square or rectangular mould lined with parchment paper, ensuring the surface is flat and even. Refrigerate until the mixture is firm and cool, 15-20 minutes. Slice into bars.IMG_3557

*If your dates don’t feel sticky and moist, soak them in water for 10 minutes then drain before processing. This will ultimately help hold the bars together better.

Lemon Coconut Loaf


IMG_3486

Coconut and lemon are a match made in heaven, and when that match is a dense crumbed, delicious and butter-less lemon loaf, well you may as well skip the rest of this and head straight to the recipe. But before you do, let me just point out that this is one of those cakes you need to have in your repertoire of baking. A slight variation on an otherwise very simple lemon yoghurt cake, the coconut and honey add a surprisingly decadent flavour and the ground almonds give the cake the perfectly dense texture similar to a pound cake ladened with butter…except there is none, so you can eat another piece, right?

Make this cake ahead and it stores well in the fridge for a couple of days but like many baked goods, it’s best moments are when it’s pulled straight from the oven, slathered with soft butter and served with a cup of tea.

IMG_3508

Ingredients:

1 cup all-purpose flour
1/2 cup ground almonds
2 teaspoons baking powder
1/2teaspoon kosher salt
1/2 cup sugar
2 tbsp honey
2 tablespoons finely grated lemon zest
1 tbsp lemon juice
3/4 cup whole-milk Greek yogurt
1/4 cup vegetable oil
2 large eggs
1/2 teaspoon vanilla extract
1/2 cup sweetened desiccated coconut

IMG_3476

  • Preheat oven to 350/180C. Line a nonstick loaf pan with parchment paper
  • In a bowl combine flour, ground almonds, baking powder and salt. Whisk to combine.
  • In a separate bowl combine sugar and lemon zest, rubbing the mixture together. Add yogurt, honey, lemon juice, vegetable oil, and vanilla. Add eggs, one at a time, whisking to combine.
  • Fold the dry ingredients into the egg mixture, finishing with the coconut.
  • Pour into the loaf tin and bake for 45-50 minutes until a toothpick comes out clean. If you find it’s browning too quickly, tent with tin foil. Remove from the tin and allow to cool slightly before digging in.


Date and Almond Energy Bites

dateswhole
Having spent time living in the Middle East I’ve become a big lover and fan of Medjool dates. They remind me of a much more relaxed and slower pace of life during Ramadan when dates and a glass of milk are often used to break a fast. Dates are not only rich in dietary fibre and antioxidants but these soft, delicious fruits can quickly boost your energy (which is needed when you have not eaten all day). While dates are quite sweet, they are an excellent low fat natural substitute for sugar or processed sweeteners. What’s more fantastic about them is that they contain key minerals that your body requires to maintain a healthy heart and blood pressure and prevent cardio vascular diseases, arthritis and other inflammation related ailments. These wonderful little fruits are great for no-bake raw recipes because the stickiness helps bind other ingredients together. In this recipe, I’ve created some simple but very tasty date and almond energy balls and added some raw cacao powder which is sure to satisfy your chocolate craving!
dates

Makes 12 energy balls

1 ½ cups raw almonds, 200g, (reserve 2 tbsp for dusting at the end)
2 tbsp raw cocao powder
1 tsp chia seeds
½ tsp fine salt

25 Medjool dates, 200g
2 tbsp raw almond butter

  1. Ground almonds in a food processor until finely ground (if you don’t have a strong enough processor, buy raw ground almonds and use 1 ¾ cup). Set aside 2 tbsp for dusting.
  2. Add cocoa powder, chia seeds and salt to the almonds.
  3. Remove pits from dates and add to the processor along with almond butter and blend until it forms a paste.
  4. Scoop a spoonful into your hand and roll into a bite-sized ball – make 12.
  5. Lightly roll the balls in ground almonds (optional).

Store these delicious little bites in a container in the refrigerator. Try not to eat them all at once!

(Not your typical) Banana Pancakes!

IMG_3417

Waking up late on a weekend often calls for a good brunch. Whether it’s a remedial (too many glasses of wine the night before) or just simply taking the time to savour a long, and often big breakfast with friends, brunch has become the “it” girl of the food world. So many restaurants now offer the best brunch in the city, featuring gourmet eggs benny among other artisanal ingredients and culturally fused dishes. There is something to be said however, for being able to make a killer brunch at home while remaining in your pj’s with a big mug of coffee and the weekend post… especially when its 20 below.
Scouring some newly acquired cookbooks has become a daily activity, and there are always recipes I go back to time and time again. These “pancakes” were one in particular that struck my attention as they had two of my all time favourite breakfast ingredients in them, simply oats and bananas. I was already a huge convert to porridge as my breakfast mainstay so one look at these deliciously nutty, crispy on the outside but soft in center banana fritters and I was sold. Despite the lack of your typical pancake ingredients, these little fritters pack a flavour punch. Turns out, gluten/dairy/egg and sugar-free things aren’t so bad after all!
The great thing about these pancakes is the flexibility of ingredients. Don’t like almond or coconut milk? Try substituting soy or rice milk. Dislike cinnamon? Try a pinch of freshly grated nutmeg. There are a million ways that you can tailor this recipe to be your own so feel free to experiment!

Oat and Banana Pancakes

1 cup oats (gluten-free work just fine!)
handful of pecans or walnuts chopped ( I like to do it in a food processor)
1 vey ripe medium banana
1 tsp baking powder
1 tsp ground cinnamon
1 tsp ground flax
160-180 ml of almond or coconut milk
blueberries or raspberries
coconut oil or butter

1.In a food processor, blend the oats until flour consistency. Empty into a bowl along with baking powder and pinch of salt, flax and cinnamon.
2.Add the banana and 160 ml of milk to the food processor and blend until smooth
3.Combine the banana mixture with oat mixture and pecans. Add the additional 20 ml of milk if the mixture looks too thick, it should be the consistency of  a loose porridge. Allow to sit for 5 minutes to activate the baking powder.
4.Heat coconut oil or butter in a nonstick pan. Add a tablespoon of batter and flatten it a bit. Add a couple of blueberries on top, as soon as bubbles appear, flip the pancake and cook until golden brown on both sides
5.Serve with maple syrup, coconut yoghurt and extra butter!

Freekah and Beluga Lentil Salad

The best way to ease into a year of better eating (or cleansing) is to start by incorporating healthful, satisfying whole grains and veggies that keep you full and curb those incessant sweet cravings you developed over the holidays. Salads are by far the best place to start, and with all the superfoods available at your fingertips, it’s become even easier to eat well.

This freekah and beluga lentil salad covers all the bases. It’s simple, healthy, substantial and packed with nutrients. Beluga lentils are beautiful beads of nutrition that glimmer to the likes of caviar once cooked. Low in fat and packed with protein and fiber, lentils are one of the most nutritious vegetarian substitutes and will make even the most carnivorous in the family feel satisfied. The advantage of these little lentils are that they have a relatively quick cooking time and possess a delicious but mild nutty flavour that pairs well with lots of fresh herbs and citrus.

Freekah on the other hand is wheat that has been harvested while its still young. Often referred to as green whole or cracked wheat, it has a mildy nutty flavour and texture similar to bulgur wheat. It’s fairly low on the glycemic index and packed with protein, significant fiber and healthy minerals. Freekah is like the supped-up version of quinoa and works wonders in salads, soups and stews.

This salad is great for lunch but would make for a light but substantial dinner if topped with some extra protein such as a poached egg.

So what are you waiting for, go on and get Free-kah!

IMG_3358

Freekah and Beluga Lentil Salad
85g (1/2 cup) beluga lentils (or substitute du puy)
1 bay leaf
130g (1 cup) freekah
1 small fennel bulb, thinly sliced
1 large handful fresh parsley, leaves removed
½ cup dill, finely chopped
2 tsp. nigella seeds
60g (½ cup) pomegranate seeds
1 avocado, cubed

Dressing
1 tbsp. water
1 tbsp. apple cider vinegar
1 tsp. agave
1 tsp. mustard powder
1 garlic clove, finely chopped
1 tsp. soy or tamari
2 tbsp. lemon juice
1 tbsp. flax oil
1 tbsp. olive oil

  • To prepare the lentils, rinse well with cold water and place in a small saucepan with 1 cup of water and the bay leaf. Bring to the boil, reduce to a simmer and cook covered for 35-40 minutes until tender but still has a bite. Drain and rinse with cool water, allow to drain dry.
  • To prepare the freekah, rinse well with cold water and place in a larger saucepan with 2.5 cups of water. Bring to the boil, reduce and simmer uncovered for 20 minutes. Drain excess water and allow it to cool to room temperature.
  • In the meantime, thinly slice the fennel along with the dill and prepare the parsley.
  • To make the dressing, whisk all ingredients together except the oil. Slowly add the oils to emulsify, season to taste.
  • Combine the freekah, lentils, fennel, herbs, pomegranate seeds, nigella seeds, and avocado with the dressing. Season to taste. Serve chilled or at room temperature.

Tahini Cookies

It’s been a while since we’ve posted something sweet on the blog. Not only are we drawing near the holiday season (where sweets should always be in abundance) but we also tend to seek comfort in winter baking. Whether it’s the nostalgia of the holidays or the fact that the weather is getting cooler, baking is the one activity that seems to become ever so popular around this time of year. Having recently been blessed with some extra time on my hands, I find myself frequently flipping through cookbooks and food magazines for baking inspiration…or maybe it’s to satisfy my sugar addiction…one way or another, I’ve got plenty of time for some recipe testing.

If there was one cookie to satisfy the sweet and savoury palate, this is it. I used to buy these by the box from Ottolenghi around the corner from my flat, and when I worked in the pastry kitchen there, these were always the “broken” snacks we were being fed with our morning coffees to keep us awake and happy. The balance of sweetness combined with the buttery, almost creamy texture of the cookie is perfect. I think a lot of people get thrown off the name because it contains tahini, the sesame seed paste often affiliated with Middle Eastern cuisine, but the sesame lends its very own natural sweetness and creaminess to an otherwise very simple and standard shortbread. Trust me when I say these are the most addictive cookies you will ever make and even those who say they don’t like sweets will be begging you for more.

Ottolenghi’s Tahini Cookies- adapted from Jerusalem 

IMG_3329

130g caster sugar (granulated works too!)
150g unsalted butter, at room temperature
110g light tahini paste
½ tsp vanilla essence
25ml double cream
270g plain flour
4 tbsp sesame seeds

Method

IMG_3309

  1. In a stand mixer fitted with a paddle attachment, or a large bowl, cream together the butter and sugar until soft and combined. Careful not to over whip and aerate the mixture
  2. Add the tahini paste, vanilla and cream, mixing to combine. Gradually add the sifted flour and mix until it begins to form a dough
  3. Turn onto a surface and knead gently until the mixture has come together. Divide in half, roll into two logs and cover with cling film. Refrigerate for at least 1 hour until firm
  4. Preheat your oven to 200C. Line two large baking trays with parchment paper. On one tray, spread out 2 tbsp of sesame seeds and roll the chilled dough to cover evenly. Slice 2cm rounds and sprinkle with remaining seeds. Repeat with other log
  5. Place the rounds onto the clean baking tray, leaving enough space between them as they will expand slightly. Bake for 10 minutes until golden brown. Remove and let cool completely on a wire rack

*The great thing about these cookies is the dough can be made ahead, refridgerated for up to two weeks or frozen for up to two months. Once baked, keep in an air tight container for up to one week.


Roasted Cauliflower and Potatoes

This is the first time I have picked up potatoes that were not white, yellow or orange and look at the purple colour of these majesty potatoes once you slice them open!  Purple majesty is a natural variation crossed from potatoes that originate from the Andes that have developed deep red and purple colours.  However unlike regular potatoes, these deep purple-blueish spuds are packed with antioxidants which can help prevent cancer and cardio vascular related diseases.  These potatoes have the same goodness that you would find in other blue coloured superfoods such as blueberries and blackberries.  Plus, these purple spuds are relatively lower in sugar content versus other varieties.

purple potatoes mapleandmiso

The other lead vegetable is this salad is cauliflower.  I rarely pick up cauliflower these days but when I do, I am always reminded of how much I love the taste of roasted cauliflower (not the bland boiled ones from the 80s/ 90s). When seasoned and roasted well these fleurets are seriously delicious and I suspect that even traditional cauliflower-haters would learn to love this vegetable.

cauliflower mapleandmiso
If you are thinking of making this recipe, I know that cauliflower can be easily found but it could likely be difficult to find purple potatoes.  Feel free to substitute the purple majesty with regular new or fingerling potatoes because not surprisingly these purple potatoes taste, well, very potatoe-y!
salad mapleandmiso

Ingredients

1 cauliflower head, fleurets trimmed
12 majesty potatoes, sliced
1 garlic clove, chopped
1 tbsp olive oil
100g (1/2 pack) feta
salt and pepper to taste

1 pack rocket/ arugula

cauliflower seasoning
1 tbsp tumeric
1/2 tbsp cumin
1 tsp paprika
1 tsp cornflour
1/4 tsp salt
1/4 ground black pepper

dressing
2 tbsp cider vinegar (or white wine vinegar)
1 tbsp mustard
3 tbsp good olive oil
1/2 tsp salt
1/4 tsp ground black pepper

1. Preheat oven to 180C/ 350F
2. Trim the cauliflower fleurets into bite sized pieces, wash and dry
5. Mix the seasoning spices in a large bowl and toss cauliflower in seasoning. Bake on a lined tray for 40-50 minutes, turning a few times in between until a deep golden colour
3. Wash and slice potatoes lengthwise about 1/2 cm thick and chop garlic
4. Toss the potatoes in the garlic and olive oil and season with salt and pepper. Lay on a lined baking tray and crumble feta on top. Bake for 20-25 minutes until potato edges are golden crispy.
5. Make the dressing by mixing the mustard and vinegar until smooth, then add the olive oil, salt and pepper.
6. Wash and dry arugula. When ready to serve, toss the arugula in dressing coating evenly then gently mix-in the potatoes and cauliflower.

Simple Miso Tahini Eggplant

What I love most about this recipe is that it is incredibly easy to make and tastes oh-so-delicious!  Miso tahini eggplant (or aubergine as they call it in the UK) is a great dish for entertaining or for nights when you feel like going veggie.  So if you haven’t fallen in love with miso from our classic savoury Miso Oats recipe then give this dish a try.  Pair the eggplant with some brown rice or quinoa with a splash of soya sauce and dinner is all set!

eggplant mapleandmiso


Ingredients (serves 2 as main or 4 as a side)
2 medium sized eggplants, halved
2 tbsp olive oil
sea salt

parsley or spring onion for garnish

Marinade
2 tbsp tahini
2 tbsp white miso paste
1 tbsp maple syrup
3 tbsp mirin (can substitute with white wine or water)

  1. Preheat oven at 180C/ 350F
  2. Wash and halve the eggplant lengthwise. Score the flesh in a diamond patter without cutting through the skin. Brush flesh with olive oil and season with a pinch of salt. Bake skin side down on a lined baking tray for 20 minutes.
  3. Mix marinade and brush on top eggplant after initial baking. Bake for another 20-25 minutes until eggplant is soft and golden. Add garnish and serve.


Rosemary Carrots and Maple Balsamic

I’ve been so excited to see all the autumn vegetables and fruits! And who doesn’t love roasted root vegetables – crispy on the outside and sweet and fluffy on the inside. I picked up these beautiful carrots with the tops still on and paired them with some crimson red radicchio and endives leaves. With carrots, I often like to leave the green tops on when they are served as a side dish to a savoury roast beef or chicken. However for salads, I’ll trim the tops and cut the carrots down to a manageable bite size.

mapleandmisorawcarrotsmapleandmisocarrots

The other star in this salad is the green apple, Granny Smith. Did you know that there are over 7,500 types of apples? Growing up in Ontario, Canada where there are many apple orchards, apple picking is a very popular autumn activity. So when I think of fall fruits the apple immediately comes to mind – hot apple cider, cinnamon apple pies, apple loaf cakes, caramel candied apples … For this salad, I’ve grilled some sliced apple and added a sprinkle of cinnamon to help bring out some great autumn flavours.

mapleandmisosaladclose

Ingredients

1 bunch small carrots (about 12)
1 tbsp rosemary, leaves chopped
2 tbsp olive oil
Sea salt and freshly ground pepper, to taste

1 granny smith apple
1 tsp olive oil
a pinch of cinnamon and salt

 ½ large red radicchio, leaves torn
1 red endive, separated leaves
2 cups red cabbage, sliced

 Dressing

1 small shallot, finely diced
2 tbsp balsamic vinegar
1 tbsp Dijon mustard
1/4 cup olive oil
1 tbsp maple syrup
½ tsp salt
¼ tsp freshly ground pepper

  1. Preheat the oven to 180C.
  2. Wash, trim and halve (or even quarter) the carrots. Coat in olive oil and rosemary. Line baking tray with parchment and roast carrots for 15-20 minutes until cooked.
  3. Wash and core the apple but keep the skin on. Slice and toss in olive oil and a pinch of cinnamon and salt. Heat grill pan on high heat and grill the slices for 3-4 minutes on each side until grill marks are visible. Set aside.
  4. Prepare the radicchio, endive and cabbage for the salad.
  5. Combine all the dressing ingredients in a jar with a lid and shake well. When ready to serve toss the leaves with the dressing and add in the carrots and apples at the end.

Autumn Kale and Sausage Salad

While autumn has officially begun, we have been enjoying an abnormal but extremely pleasant flourish of summer sunshine in London. We’re talking about sunshine and 20C weather and it has been the driest September ever – at least ever since the weather people have been keeping track! So while I am ready for the warm savoury winter stews and soups, I am inspired to keep the cooking on a lighter side before the drearier London weather sets in.

lambsausageskale

I am very fortunate to have an incredible organic butcher down the street from where we live. http://farm.sheepdrove.com/. The team there is very knowledgeable, friendly and always smiling. I rarely cook red meat, but when I sent my husband to pick up some protein at the butcher (which never happens) he returned with some organic lamb and rosemary sausages – yum! The recipe below is my take on a warm autumn salad that will leave you feeling satisfied but requires very little work. It is a perfect weekday dinner that you can whip up within 30 minutes at home. The trick to this salad is not to overcook the kale so it maintains its texture and colour. Enjoy!

Serves 2

Ingredients
2 organic lamb sausages, 250g

200g baby new potatoes, halved

1 bunch/ 200g kale, stems removed, torn
4 baby radishes, thinly sliced
1 garlic clove, finely diced
1 shallot, finely diced
3 sprigs of tarragon or mint, keep some for garnish
1.5 tbsp olive oil
Sea salt and freshly ground pepper to taste

Directions

  1. Slice the lamb sausages into 2cm wide rounds and set aside.
  2. Wash and rinse potatoes. Cover in cold water in a pot and salt generously. Bring to a boil and simmer for 10-15 minutes until tender. Drain, cut into halves and set aside.
  3. Prepare the kale by removing stems and tearing into bite-sized pieces. Wash and dry the kale.
  4. Remove the stems from the herbs and roughly chop. Keep some whole leaves for garnish.
  5. Trim the radish ends and thinly slice. Combine the radishes, ½ tbsp olive oil, chopped herbs and salt and pepper.
  6. Finely dice the shallot and garlic.
  7. Heat a large pan with the olive oil on medium heat. Add shallots and cook for 2 minutes. Add the garlic and sliced sausages and cook for 5 minutes occasionally stirring until done.
  8. Toss in the kale and cooked potatoes and cook for 2-3 minutes until kale become a vibrant deep green (do not over cook the kale otherwise it will wilt and brown). Season with salt and pepper.
  9. Remove from the heat and toss in the herb infused radishes.
  10. When serving, garnish with fresh herb leaves.


Warm Quinoa with Lemon Yogurt Dressing

_MG_5656

I recently went for brunch at one of our ‘locals’, which in British lingo is the local pub or ‘public house’ that you regularly go to.   I was craving some classic fluffy scrambled eggs with chilli lime avocado toast or crème fraîche smoked salmon on toast.  Torn between the two, I had to make a game time decision when our server came to take our order and I went with the salmon. I was immediately pleased with my decision when the server brought salmon and eggs to the girl at the next table beside us – it looked beautiful and delicious!   However, the server then headed over to tell me that they had run out of salmon (shriek) and (get ready….) avocado and that the only other egg items they had available on the menu were the full English or hash (but no mushrooms or tomatoes because they ran out of those too). At this point, I was ready for a terrible food experience except that we ended up ordering the seasonal salad – warm chicken and fregola tossed in a lemon yogurt dressing. What the description didn’t include was that it also came with delicate and nutty tenderstem broccoli, thinly sliced radish, crunchy mangetout and sweetly bitter endive – a dish right up my alley. Was it ever yummy and here is my take on a warm brunch-friendly salad.

_MG_5629 copy

Warm Quinoa with Lemon Yogurt Dressing
Optional: Add the Grilled Yogurt Chicken

Serves 4

1 cup quinoa
1 ¾ cup water
salt

200g cherry tomatoes, quartered
100g mangetout, finely sliced
1 endive, sliced
200g tenderstem broccoli (or purple sprouting)
sea salt and pepper

Dressing
1 cup Greek yogurt
1 tsp white wine vinegar
1 lemon, juiced
3 tbsp olive oil
1 garlic clove
sea salt and black pepper to taste


  1. Cook the quinoa with water and pinch of salt in a pot. Bring to a boil then reduce and simmer for 12-15 minutes with the lid on until all water is absorbed and spirals are revealed. Turn off the heat and place a dry dishcloth over the pot with the lid on top until ready to serve. This will help absorb any excess water and keep the quinoa warm.
  2. Make the dressing by combining all the ingredients in a blender. (I like to use a hand blender for dressings). Keep aside.
  3. Wash and slice the cherry tomatoes, mangetout and endive.
  4. Cut the broccoli into bite size pieces and toss in olive oil, salt and pepper. Heat a fry pan and cook for 1-2 minutes until the broccoli becomes vibrant green.
  5. Toss all raw vegetables with the dressing and add the warm quinoa – gently mix. Top with the broccoli and/ or the Grilled Yogurt Chicken (which I have done here for a dinner meal).

Grilled Yogurt Chicken


yogurtchicken

This is PART TWO of trying to grill at home in a tiny London flat (here is PART ONE: Turkey Courgette Burgers). Missing the Canadian BBQs, I decided to yet again sacrifice my flat and create some smoky heat on my cast iron grill pan to mimic the flavours and nostalgia of summer days in Canada!  While indoor grilling doesn’t stack up to the charcoal taste of outdoor grilling and being in the warm sunshine, this indoor grilling experiment proved worthy once I sunk my teeth into the juicy savoury grilled chicken and ignored the smoky haze that had built up in my flat.

I have always loved tandoori chicken (even with the traditional skin-off cooking method) because the yogurt marinade prevents the meat from drying out and the chicken stays incredibly moist – or so they say.  So I tested this recipe with one breast skin-off and the other skin-on and wow, I could barely notice the difference in the two. Go yogurt!

This yogurt marinade recipe is a twist on the intensely flavourful tandoori spice giving the dish a more delicate profile (and hopefully less pungent smokiness in my flat). In the end despite altering the marinade, the smokiness very much lingered longer than welcomed! However, I would say that it was still worth it. #crazycanadians

Serves 4

4 pieces of boneless chicken (breasts and/ or thighs)

Marinade
½ cup Greek yogurt (plus some for the dressing)
½ tsp coriander seeds
¼ tsp fennel seeds
¼ tsp cumin
½ tsp red pepper flakes
¼ tsp crushed black pepper
½ tsp salt
4 garlic cloves, minced
1 lemon, zest and juiced

  1. Prepare the marinade by toasting the coriander and fennel seeds for 1-2 minutes until you detect the scent of the spices. Remove from the heat and crush using a mortar and pestle or a spice grinder. Combine all the remaining marinade ingredients including the spices and stir until even.
  2. Coat the chicken in the marinade and refrigerate for 4 hours or overnight.
  3. When ready to cook, sear the chicken for 3 minutes on each side (whether you are using a BBQ or an grill pan in my case) on medium heat to get some char-grilled marks. Finish cooking in the oven/ BBQ for 15-20 minutes until done. Remove and rest for 5-10 minutes.
  4. Serve the chicken shredded or whole with any of our salads! I paired it with the Warm Quinoa with Lemon Yogurt Dressing (coming up soon).

_MG_5655 copy

Pink Grapefruit and Purple Kale Salad


grapefruitkale

It is Monday and after a deliciously indulgent week + weekend celebrating the birth of my new nephew, I am feeling a bit sluggish and experiencing some post-celebration blues.  So I needed something bright and cheery to kick off the week ahead and as usual… I turned to food!  I peeked into my fridge and saw that I had some perfectly ripe figs that would be great in a salad but there was not much else in there.

I headed over to my local green grocer to see what they had in stock and for the first time in a while I spotted some organic purple kale.  Yum and so pretty – just what I needed!  I also grabbed some other great detoxifying produce to help me get back on track and boost my energy level.  I picked up a pink grapefruit which is high in vitamin C and antioxidants plus I grabbed some immunity building and bacteria fighting cabbage.  I now had all the ingredients to make a gluten free vegan salad to try and cure the unwanted Monday Blues!

grapefruitkale_ingredientsServes 2

Ingredients
1/2 cup quinoa
1 cup water
pinch of salt

8 purple kale leaves, stems removed
1 medium sized grapefruit
2 figs, quartered
1 cup (100g) purple shredded cabbage

Dressing
1/2 shallot, minced
1 tsp dijon mustard
1 tsp maple syrup or honey
2 tsp rice wine vinegar (or any wine vinegar)
1/3 cup extra virgin olive oil
ground sea salt and black pepper, to taste

  1. Rinse quinoa in strainer. Add the quinoa, water and pinch of salt in a pot and bring to a boil then reduce and simmer for 12-15 minutes with the lid on until all water is absorbed and spirals are revealed. Turn off the heat and place a dry dish cloth over the pot for 5 minutes before fluffing with a fork.
  2. Combine all the dressing ingredients in a jar and shake vigorously to mix.
  3. Remove the stems from the kale, tear into bite size pieces, wash and spin dry.  Gently massage the dressing onto the kale and allow it to sit for 15-20 minutes in the refrigerator.
  4. Peel, seed and cut the grapefruit into segments, quarter the figs and slice the cabbage with a mandolin or with a knife.
  5. Toss the cabbage and quinoa with the dressed kale and garnish the salad with grapefruit and figs.

Simple Fresh Seafood Pot


_MG_5517 copy
Since moving to London, what I have found to be an incredible experience is to head over to Billingsgate Market, the largest fish market in the UK located at Canary Wharf in London.  This bustling market is the where many of the local restaurants and retailers come to buy their fresh seafood.  Just watch out for the large crates of fish being moved around by the porters and the splashing water from their heavy-duty rubber boots! The market closes around 7am so you need to get there bright and early to get the full experience!
http://www.billingsgate-market.org.uk/ Opens at 4am daily except it is closed on Sunday and Monday

However, very few of us regularly have time, energy or a desire to get up that early and head over to such a fish market – I certainly do not! Luckily, I recently discovered an excellent fishmonger on Golborne Road at the top of Portobello Road in Notting Hill! Woo hoo!

Cooking fresh seafood at home can be such a treat and a great way to impress friends and family. This simple recipe is very easy to prepare and the Spanish chorizo gives the dish a punchy flavour that beautifully compliments the clams and prawns. Serve this dish with a crusty baguette so you can soak up the delicious broth at the bottom of the bowl.

_MG_5469 copy

Serves 2 as main or 4 as starter

Ingredients

20-25 clams
10 whole prawns (approx. 500g)

4 tomatoes, chopped
1 medium sized onion, diced
2 cloves of garlic, crushed
1 bunch of roughly chopped parsley, discard stems

3 tbsp olive oil
2 chorizo links (approx. 50 g each)
1 tbsp tomato paste
1 cup of wine white or stock
1/2 lemon
Sea salt and freshly ground black pepper

1 crusty baguette

  1. Rinse and soak the clams and prawns in cold water and set aside. Discard any clams that are wide open or are broken. When ready to cook, drain.
  2. Prepare the tomatoes, onion, garlic and parsley and slice the chorizo.
  3. Heat the olive oil in a large pot with a lid.  Cook the chorizo on medium heat for 5 minutes until the flavours from the chorizo are released.  Your oil will be very red in colour from the pimento/ paprika seasoning in the sausage!
  4. Add the tomato paste and cook for a minute stirring so the paste is evenly distributed.
  5. Add the diced tomatoes and cook for another 3 minutes until boiling.
  6. Add the prawns and cook for 3 minutes with the lid on.
  7. Give the seafood a quick stir then add the clams and one cup of wine or stock and steam with the lid on for another 3 minutes (prawns take 5-8 minutes to cook and clams take 2-4 minutes).  Once the clams have opened you are ready to serve.  Discard any unopened clams.
  8. Sprinkle the chopped parsley, squeeze half a lemon and season with a pinch of salt and a few good grinds of black pepper.

Cherry Raspberry Eton Mess

_MG_5582

A heat wave has hit London, and for the past couple of weeks it’s been one hot, humid mess in the city. It’s hard to complain though when 95% of the time here it’s either raining or overcast, so everyone tries to make the most of the sunshine and warmer temperatures.

Baking in this weather requires serious determination. Resisting the temptation to turn on the oven in my flat (which has no air con) and make something that requires little time in the kitchen is why a fresh summer dessert like an eton mess is the perfect option, and it’s oh so simple to make.

A very traditional pudding (that’s dessert for you North American folk) in the UK and named after one of the most prestigious colleges, it is typically comprised of meringues, cream, and strawberries. Probably one of the easiest desserts to build your own interpretation on, using whatever seasonal fruits or berries you would like. I chose cherries, which are just coming into season and raspberries to compliment the sweetness from the cherries and tartness from the yoghurt I folded into the cream. I’m cheating a little by using store-bought meringues, but they happen to be raspberry meringues from Ottolenghi so I don’t feel too bad. Try and find the best quality meringues you can, the ones with the gooey center and crisp outside work best for a dessert like this. Eton mess also happens to be perfect for crowds, similar to a trifle you can build it in a large bowl just make sure you serve it right away as you want maintain the crunch in the meringue. Perfect for hot summer nights with an aperitif, it’ll make you wish summer would last just that little bit longer.
_MG_5574

Serves 4
*quantities can easily be increased, just ensure the cream is approximately double the amount of yoghurt

2 large meringues, broken into large and small pieces
300 mL double cream
170g plain greek yoghurt
1 vanilla bean, split and seeds removed
¼-1/2 cup icing sugar, depending on the sweetness you want
250g raspberries (one punnet) divided in half
250 g cherries, pits removed but leave a couple whole for garnish
3 tbsp granulated or caster sugar
½ lemon, zest and juice
¼ cup shaved almonds, lightly toasted

_MG_5567

Compote

  • In a small saucepan combine half the raspberries and cherries with lemon zest, juice, and sugar
  • Bring to the boil and then reduce to a simmer for 10-15 minutes
  • Transfer to a small bowl and allow to cool completely. This can be made up to 2 days in advance and stored in a air tight container in the refrigerator

Mess:

  • In a large metal bowl, gently begin to whip the cream until soft peaks begin to form. Add the vanilla and sugar and whisk a bit further.
  • In a separate bowl, whisk the greek yoghurt until smooth. Gently fold into the cream mixture
  • In your serving dish begin to layer the items beginning with the cream, then the compote, remaining fresh berries and meringues. Repeat as many times as possible in the serving dish. Top with cream and toasted almonds. Serve immediately


Turkey Courgette Burgers

IMG_1889
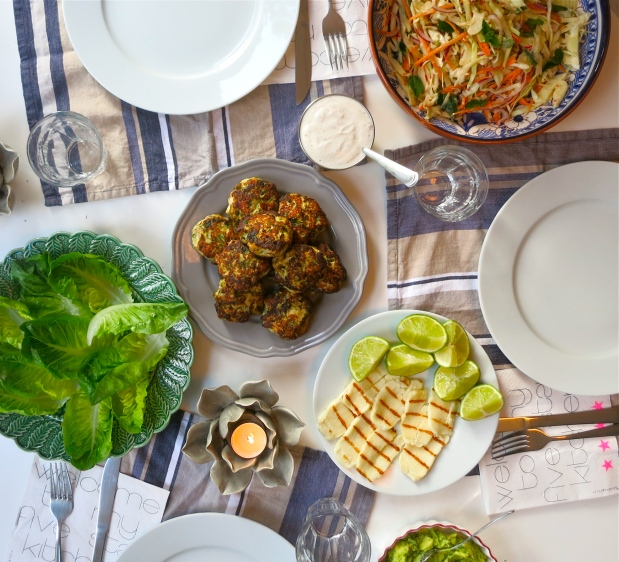
Turkey Courgette Burgers with Yoghurt and Slaw

There are a few things I truly miss about Canadian summers: consistently hot weather, cottage country, and barbequed food. It’s practically impossible to recreate the flavours of the grill over a stovetop, regardless if you have the best cast iron grill pan or most delicious homemade bbq sauce. The smokiness and caramelization that occurs on foods over a hot flame are simply the best. Unfortunately for me I have no barbeque in my tiny flat, so I needed to improvise!

I had a hankering for a summery meal that could be made indoors so I turned to Ottolenghi once again for inspiration. I had made these turkey “burgers” once before and they were mediocre… that was before I knew how to really cook and go beyond the recipe to showcase flavour. This time I knew what I was after, so little by little I started to work around the recipe until I was happy with the end result. As I daydreamed about these burgers going on a real grill, I somehow managed to concoct something rather marvelous for being done in a fry pan. Packed with bright flavours of chili, ginger and coriander, these little burgers were surprisingly delicious. Turkey is very low in fat therefore dries out quickly, so the courgette helps quite a bit to add moisture back into them. If I were lucky enough to grill these I would add some breadcrumbs into the mix as its quite wet and probably wouldn’t hold up perfectly, however this is completely optional and you could go rogue and attempt to grill them as is. Don’t be shy with the quantities, if you like a little more of something or less of another just play around with it. Other fresh herbs can easily be added or substituted…think summertime so parsley, dill, basil would all work perfectly. Serve these up in buns or bun-less if you prefer, with a good dollop of sumac yoghurt and a hearty scoop of guacamole.

Turkey Burgers
Serves 4

500g Turkey mince
1 egg, beaten lightly
2 tsp ground cumin
2 tbsp fresh mint, finely chopped
3 tbsp fresh coriander, finely chopped
2 garlic cloves, minced
2 tbsp fresh ginger, finely grated
1 courgette, roughly grated
3 spring onions, finely chopped
1 green chili, seeds removed and finely chopped
salt and pepper
2-3 tbsp vegetable oil
2-3 limes, to serve
*1/2 cup breadcrumbs (optional)

  • Combine the turkey mince, ground cumin, mint, coriander, garlic, ginger, chili and spring onions in a large bowl.
  • Add the grated courgette and egg and mixing with your hands to combine. Season well with sea salt and fresh ground black pepper
  • Form into small patties (roughly 65g each) or larger ones for a proper burger. I managed to get 14 small patties out of the mix.
  • Preheat the oven to 400F/200C and line a tray with foil or baking parchment.
  • Heat a non-stick fry pan with 1 tbsp of oil, in small batches brown the patties on all sides, adding more oil when needed.
  • Place on the tray and bake in the preheated oven for 5-7 minutes or until the turkey is no longer pink inside.
  • Alternatively, preheat your barbeque to medium high heat. Lightly grease the rack with vegetable oil and cook the burgers for 4-5 minutes per side until done.

IMG_1896

Slaw
Serves 4

1 fennel bulb, tough stalk removed and finely sliced
¼ white cabbage, finely sliced
1 red onion, finely sliced
1 carrot, julienned
3 tbsp + 2 tbsp fresh mint leaves, torn
½ red chili, seeds removed and finely chopped or sliced

Dressing
1 tbsp pomegranate molasses
2 tsp honey
1 tbsp tahini paste
1/2 tbsp warm water
1 lemon, zest and juice
1 tbsp olive oil
1 tbsp fresh ginger, finely grated
salt and pepper to taste

  • Combine the fennel, cabbage, carrot, chili, onion and 3 tbsp of fresh mint. Cover and refriderate until needed.
  • In a separate bowl, combine the pomegranate molasses, honey, tahini, water, lemon juice and zest, olive oil, ginger and whisk to combine. Season to taste. If too thick, dilute with lemon juice.
  • Before serving, toss the slaw with the dressing and top with remaining mint leaves.

Guacamole
2 avocados
1 lime, zest and juice
½ lemon, juice
½ red chili, seeds removed and finely chopped
1 tbsp fresh coriander, chopped

1. In a small bowl, gently mash the avocado leaving larger chunks. Add the lemon juice, chili, fresh coriander, lime juice and zest and mix to combine. Season to taste. Keep refrigerated until needed.


“Green” Bulgur Salad


Processed with VSCOcam with f2 preset

There is something about a good salad recipe that will never get old. Sure you can experiment with interesting flavour combinations or exotic ingredients, but there is comfort in familiarity and simplicity that makes certain dishes really stand out.

I came across this recipe in one of Ottolenghi’s books and what really drew me in was the herb paste used to turn the couscous from grainy yellow to vibrant green. Brilliant! (I thought to myself as I began to rummage through my fridge searching for the necessities). I for one love couscous but thought I would use another grain I’ve become all too fond of recently, bulgur wheat. Healthier, nuttier, and full of texture, bulgur is a great whole grain substitute to couscous (which is essentially pasta). I do feel like I’ve used it quite a bit in recipes posted, but it’s just become so versatile in my kitchen (so apologies, if you want to use couscous, please feel free to stick to it!)

The herb paste is basically a pesto, which with help from some lemon juice and zest, transforms this salad into something spectacular. It’s so fresh and packed with robust flavours from five different herbs. You can easily substitute the herbs or add more of one or another if you fancy. The salad can be dressed up to 2 hours before eating and is great cold or at room temperature. As with most of our salads, a good sprinkling of pomegranate seeds and a ripe avocado make the perfect finishing touch.

“Green” Bulgur Salad

120 g bulgur wheat (600 mL of water to boil)
1 avocado, diced
½ pomegranate, seeds
¼ cup whole almonds, roughly chopped and toasted
1 onion, finely sliced
1 tbsp olive oil
1 pack of rocket (I used a rocket, watercress and baby spinach mix)

Herb Paste
4 tbsp coriander
4 tbsp parsley
3 tbsp dill
3 tbsp tarragon leaves
3 tbsp mint leaves
1 lemon, zest and juice
1/3 cup extra virgin olive oil
salt and pepper to taste

  • In a saucepan, add the bulgur wheat and cover with water. Bring to the boil, reduce and simmer covered for 15 minutes. Drain and rinse well with cold water. Spread bulgur onto a clean dishcloth to absorb any excess moisture.
  • In a small pan, gently heat olive oil over medium heat and add onion. Cook for 10-12 minutes until the onion slices are nice and caramelized. Remove from heat and let cool.
  • In a food processor, combine all herbs and blitz until a paste begins to form. Add olive oil, lemon juice, zest, salt and pepper and blend until smooth.
  • Combine the bulgur with the herb paste, avocado, pomegranate and almonds. Add half of the mixed greens and toss.* it is at this point that you can cover and allow the salad to sit and marinate
  • Before serving, toss with remaining greens and a sprinkling of sea salt and freshly ground pepper


Baked Whole Fish

fishcooked

Growing up, my mom used to buy all our seafood from a fishmonger where she knew that we would be getting fresh seasonal fish and shellfish.   We would come home with live lobsters and crabs, which used to scare all of us except my dad whose responsibility was to handle the prep.  I would then only return to the kitchen once they stopped moving.

While lobsters and crabs were not daily dishes in our household, a few nights a week we would buy live whole fish.  Serving whole fish was one of our family favourites.  We often used to get live sea bass, sea bream, tilapia or pickerel from a water tank or freshly caught salmon or trout. Once we got home, we typically would bake or steam the fish whole with the bones in and the head and tail in tact!  Ginger, soy and scallions or dill, lemon and butter garnishes were some of my favourites for fish.
fishraw
Below is a simple but incredibly delicious whole fish recipe that we have paired with a fragrant crisp fennel salad, perfect for the summer months!  Make sure you ask the fish monger to remove the scales, guts and fins so when you get home all you have to do is give the fish a good rinse, garnish the fish for some flavour and pop into the oven!  It will take some experimenting to figure the appropriate cooking time, but a perfectly cooked fish has flesh that is just cooked at the bone, flakes away with a fork and never dry. Cooking time can take anywhere from 20-30 minutes.

Ingredients
Serves 2 as main, or 4 as part of a multi-course meal
750g medium sized whole wild sea bass (portion guideline: 350g per person when serving whole fish)
2 tbsp olive oil
salt and pepper
Fennel Salad and Garnish
1 fennel bulb
1 lemon
1 bunch dill
250 g yogurt
salt and pepper to taste


  1. Preheat the oven to 180C/ 350F.
  2. Rinse the fish thoroughly inside and out and pat dry with a paper towel.  Season the fish inside and out with salt and pepper and lay on top of an oiled piece of foil.
  3. Trim the fennel fronds and stuff inside the fish.  Trim and discard the bottom end of the fennel then thinly slice the remaining bulb using a mandolin or by hand for the salad.
  4. Zest the lemon using a grater and reserve the zest for the dressing. Then halve the lemon.  Squeeze the first half removing the seeds and combine with the zest.  Slice the other half and stuff inside the fish.
  5. Remove the bottom half of the dill bunch and stuff inside the fish. Roughly chop the remaining finer ends of the dill bunch for the dressing.  Combine the zest, juice, dill and yogurt and season with sea salt and freshly ground black pepper.  Toss the dressing with the fennel slices.
  6. Bake the whole fish for 20-30 minutes depending on the size (20 minutes for a 750g fish).  To test for doneness, cook until the flesh flakes easily when poked with a fork.

Courgette with Tahini Yoghurt

salad 2There is no better way, in my opinion, to kick off the summer solstice than with a fabulous meal. There is something so refreshing about the days beginning to get longer as the sun finally peaks from behind London’s typical cloud cover. It’s these summer days that make you want to stay up late, cook long meals with friends and enjoy the change in seasons.
What’s even more enticing about the arrival of summer is the food! Summer produce is hands down the best. Fruit begins to ripen naturally and we can finally buy locally sourced, seasonal vegetables. The market stalls near my flat are out bright and early, eagerly awaiting the swarms of people that come to experience the best of British produce.
There is something so lovely about being able to walk down the street to a market, Unlike back home where superstores run the system, food markets in London are in their prime, both for produce and freshly prepared foods. I guess it’s the European influence that swooned me, as I often picture myself biking along the market with a coffee in one hand and a baguette in another, my basket brimming with fresh food…this is not a common occurrence but I intend to make it one, someday!
I digress… the true inspiration for this delicious salad was a friend’s experience at a fabulous restaurant in Hackney called Raw Duck. Simple, satisfying, and healthy, this salad makes the perfect addition to any meal or on it’s own as a main. It is the perfect start to the summer dish as it highlights seasonal produce, but you could easily substitute any of the ingredients, for example grilled aubergines would work quite well as would roast beets. Have fun playing around with what’s here for the summer, as it certainly won’t last forever so we must make the most of it while we can.

Serves 2

Yoghurt

¾ cup Greek yoghurt
2 tsp sumac
1 lemon, juice and zest
1 tbsp tahini
1 tbsp olive oil
2 tbsp water
2 tbsp fresh parsley finely chopped
salt and pepper to taste
2 tsp nigella seeds

Salad

½ cup fresh peas
½ cup broad beans, blanched and peeled
½ pomegrantate, seeds removed
1 bunch fennel frawns ( or fresh dill)
2 courgette, sliced on the bias
1 tbsp olive oil
salt and pepper to taste

  • Heat the olive oil over medium heat, gently fry the courgettes until golden brown
  • Combine yoghurt, tahini, water, lemon juice and olive oil whisking until smooth. Season with sumac, nigella seeds, salt and pepper. *adjust yoghurt consistency with lemon juice
  • Spread the tahini yoghurt onto a platter, top with courgette, peas, broad beans, pomegranate and fennel frawns. Season with salt and pepper